現貨供應最新開發模組
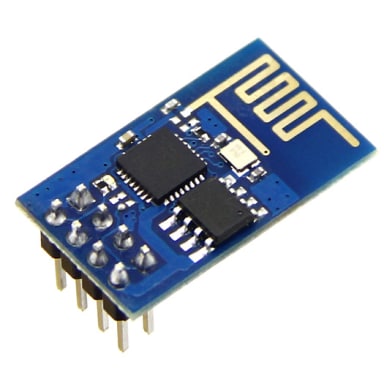
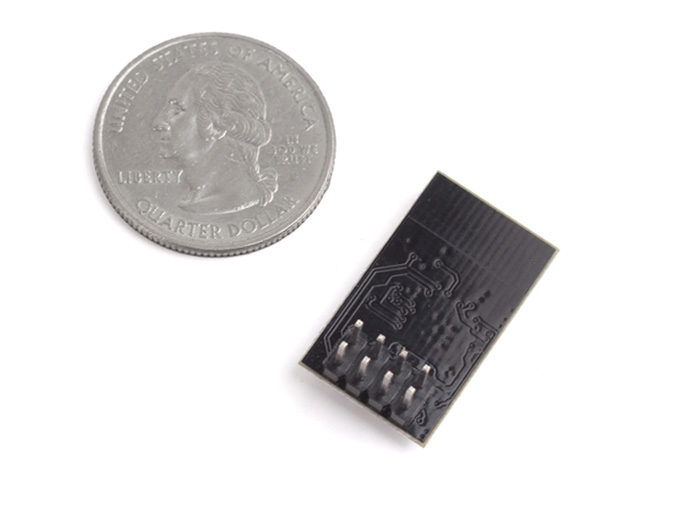
WiFi Serial Transceiver Module w/ ESP8266 - 1MB Flash


Corresponding Interface:
- Upgrade 1M Flash
- SDIO 2.0, SPI, UART
- 32-pin QFN package
- Integrated RF switch, balun, 24dBm PA, DCXO, and PMU
- Integrated RISC processor, on-chip memory and external memory interfaces
- Integrated MAC/baseband processors
- Quality of Service management
- I2S interface for high fidelity audio applications
- On-chip low-dropout linear regulators for all internal supplies
- Proprietary spurious-free clock generation architecture
- Integrated WEP, TKIP, AES, and WAPI engines
代號
esp-01e
SKU 即原廠標號
317060016
資料來源:https://www.seeedstudio.com/WiFi-Serial-Transceiver-Module-w%26-ESP8266---1MB-Flash-p-2485.html
Description
We release a tutorial for ESP8266.
This is WiFi serial transceiver module, based on ESP8266 SoC.
The SOC has Integrated TCP/IP protocol stack
We have a set of documents in Chinese. We are preparing tutorials and demo software to showcase utility of this module.
Please buy this module only when you understand the existing documents.
ESP8266 is a highly integrated chip designed for the needs of a new connected world. It offers a complete and self-contained Wi-Fi networking solution, allowing it to either host the application or to offload all Wi-Fi networking functions from another application processor.
ESP8266 has powerful on-board processing and storage capabilities that allow it to be integrated with the sensors and other application specific devices through its GPIOs with minimal development up-front and minimal loading during runtime. Its high degree of on-chip integration allows for minimal external circuitry, and the entire solution, including front-end module, is designed to occupy minimal PCB area.
Corresponding Interface
Upgrade 1M Flash
SDIO 2.0, SPI, UART
32-pin QFN package
Integrated RF switch, balun, 24dBm PA, DCXO, and PMU
Integrated RISC processor, on-chip memory and external memory interfaces
Integrated MAC/baseband processors
Quality of Service management
I2S interface for high fidelity audio applications
On-chip low-dropout linear regulators for all internal supplies
Proprietary spurious-free clock generation architecture
Integrated WEP, TKIP, AES, and WAPI engines
Specification
1M Flash
802.11 b/g/n
Wi-Fi Direct (P2P), soft-AP
Integrated TCP/IP protocol stack
Integrated TR switch, balun, LNA, power amplifier and matching network
Integrated PLLs, regulators, DCXO and power management units
+19.5dBm output power in 802.11b mode
Power down leakage current of<10uA
Integrated low power 32-bit CPU could be used as application processor
SDIO 1.1/2.0, SPI, UART
STBC, 1×1 MIMO, 2×1 MIMO
A-MPDU & A-MSDU aggregation & 0.4ms guard interval
Wake up and transmit packets in < 2ms
Standby power consumption of < 1.0mW (DTIM3)
Part List
1x Esp8266 module

Resource
Documents
Please visit our wiki page for more info about this product. It will be appreciated if you can help us improve the documents, add more demo code or tutorials. For technical support, please post your questions to our forum
Technical Details
| Weight | G.W 30g |
| Battery | Exclude |
Part List
| WiFi Serial Transceiver Module w& ESP8266 - 1MB Flash | 1 |
Documents
資料來源:http://www.seeedstudio.com/wiki/WiFi_Serial_Transceiver_Module
Tutorial for ESP8266 Serial WiFi Module
In this tutorial, we'll use a seeeduino to control the ESP8266 WiFi module to request a static page from the internet. This is a basic use of TCP socket, for other usage, please refer to the AT command guide of the module.
Material list:
   Seeeduino V3 / Arduino Uno
   ESP8266 Serial WiFi module
   UartSBee v4 / other USB to TTL converter
Note: We used a software serial to print some debugging information as there’s only one hardware serial on seeeduino board. But the limitation of software serial is that it can’t communicate in a higher baud rate than 19200. So part of the output from ESP module will be dropped because the baud rate 57600 of ESP module is higher than that of the software serial. If you have a board with more than one hardware serial (e.g. Arduino Mega 2560), the case will be easier.
Step-By-Step
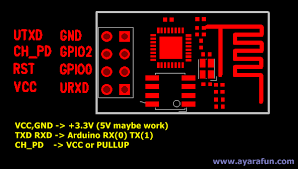
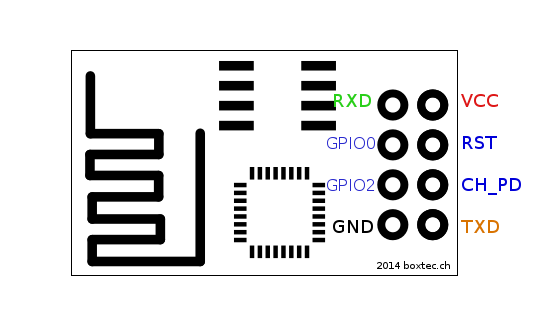
Step 1: connect module as the following picture

Step 2: Programe the seeeduino board.
- Open Arduino IDE and create a new sketch;
- Parse the following code into the sketch editor (need modifying the SSID and PASS macros into your own situation);
   #include <SoftwareSerial.h>
   #define SSID "xxxxxxxx"
   #define PASS "xxxxxxxx"
   #define DST_IP "220.181.111.85" //baidu.com
   SoftwareSerial dbgSerial(10, 11); // RX, TX
   void setup()
   {
     // Open serial communications and wait for port to open:
     Serial.begin(57600);
     Serial.setTimeout(5000);
     dbgSerial.begin(9600); //can't be faster than 19200 for softserial
     dbgSerial.println("ESP8266 Demo");
     //test if the module is ready
     Serial.println("AT+RST");
     delay(1000);
     if(Serial.find("ready"))
     {
       dbgSerial.println("Module is ready");
     }
     else
     {
       dbgSerial.println("Module have no response.");
       while(1);
     }
     delay(1000);
     //connect to the wifi
     boolean connected=false;
     for(int i=0;i<5;i++)
     {
       if(connectWiFi())
       {
         connected = true;
         break;
       }
     }
     if (!connected){while(1);}
     delay(5000);
     //print the ip addr
     /*Serial.println("AT+CIFSR");
     dbgSerial.println("ip address:");
     while (Serial.available())
     dbgSerial.write(Serial.read());*/
     //set the single connection mode
     Serial.println("AT+CIPMUX=0");
   }
   void loop()
   {
     String cmd = "AT+CIPSTART=\"TCP\",\"";
     cmd += DST_IP;
     cmd += "\",80";
     Serial.println(cmd);
     dbgSerial.println(cmd);
     if(Serial.find("Error")) return;
     cmd = "GET / HTTP/1.0\r\n\r\n";
     Serial.print("AT+CIPSEND=");
     Serial.println(cmd.length());
     if(Serial.find(">"))
     {
       dbgSerial.print(">");
       }else
       {
         Serial.println("AT+CIPCLOSE");
         dbgSerial.println("connect timeout");
         delay(1000);
         return;
       }
       Serial.print(cmd);
       delay(2000);
       //Serial.find("+IPD");
       while (Serial.available())
       {
         char c = Serial.read();
         dbgSerial.write(c);
         if(c=='\r') dbgSerial.print('\n');
       }
       dbgSerial.println("====");
       delay(1000);
     }
     boolean connectWiFi()
     {
       Serial.println("AT+CWMODE=1");
       String cmd="AT+CWJAP=\"";
       cmd+=SSID;
       cmd+="\",\"";
       cmd+=PASS;
       cmd+="\"";
       dbgSerial.println(cmd);
       Serial.println(cmd);
       delay(2000);
       if(Serial.find("OK"))
       {
         dbgSerial.println("OK, Connected to WiFi.");
         return true;
         }else
         {
           dbgSerial.println("Can not connect to the WiFi.");
           return false;
         }
       }
Step 3: Open Serial Monitor and press the reset button of seeeduino board, you’ll see the output.
At last, Happy Hakcing! :)
Related Projects
Recipe Community is an awesome place where makers share their amazing works here. Our makers have made a lot of awesome projects with esp8266, check this out!
WiFi Scanner -Know the WiFi Signal around you

Build your own Wifi Scanner with few simple steps, all you need to do is prepare:
- A NodeMcu Dev. Board
- An I2C OLED.
- Some cables
- And most importantly, a HOT HEART ON ESP8266
So, why not make one for yourself?
Primary IoT Make with NodeMcu ->ESP8266<-

An online Temperature&Humidity Monitor made with:
- A NodeMcu Dev. Board
- Grove - Temp&Humi Sensor
- Some cables
Another easy trick, why not make one for yourself?
Na, not enough? More Awesome Projects with ESP8266.
Even more Awesome Projects On Recipe.
Share Your Awesome Projects with Us
Born with the spirit of making and sharing, that is what we believe makes a maker.
And only because of this , the open source community can be as prosperous as it is today.
It does not matter what you are and what you have made, hacker, maker, artist and engineers,
as long as you start sharing your works with others, you are being part of the open source community and you are making your contributions.
Now share you awesome projects with us on Recipe, and win a chance to become the Core User of Seeed.
- Core Users, are those who show high interests and significant contributions in Seeed products.
- We cooperate with our Core Users in the development of our new product, which in another word, the Core Users will have the chance to experience any new products of Seeed before its official launch, and in return we expect valuable feedback from them to help us improving the product performance and user experience.
- Also, join the Core User Group, engage with other Core Users of Seeed and make friends with like-minded people, could be a wonder experience for you.
- And most importantly, in most of cases, if our Core Users have any good ideas about making somethings new, something creative, as long as they provide us a proposal of it, we'll offer hardware pieces, PCBA/CNC/3D Printing services, as well as technical support, to help them achieve their projects.
Get more information about Core User please email to: recipe@seeed.cc
Share Your Feedback on Seeed Wiki
Now, to enhance user experience and improve learning platform, exciting task of waiting for you. Seeed Wiki team are collecting feedback on our Wiki pages to perfect it. Please join us.
Just tell me your suggestion, or complaints, even feelings via email: ruiyun.liu@seeed.cc