Insect bot 昆蟲機器人
- 簡單好上手,6 歲到 100 歲皆可玩。
- 兩顆馬達作為雙腳,紅外線感測作為眼睛。
- 可採用三種不同程式語言進行開發
這個範例程式示範了 Insect Bot 如何行走及繞過障礙物。
// //////////////////////////////////////////////////////////////////////////////////////
// INSECT BOT MINI (Insectbot Kit Product Code: KIT0051                                //
// http://www.dfrobot.com/index.php?route=product/product&product_id=1055              //
//                                                                                     //
// modified by Lumi for DFRobot.com                                                    //
// 2013/12/23                                                                          //
/////////////////////////////////////////////////////////////////////////////////////////

// Servo Library
#include <Servo.h>
// Servo name
Servo frontServo;
Servo rearServo;
// time delay between steps
int walkSpeed = 500;
// center servos
int centerPos = 90;
// servo angles for walking pattern
int frontRightUp = 70;
int frontLeftUp = 110;
int backRightForward = 70;
int backLeftForward = 110;
// another center position
int centerTurnPos = 81;
// servo angles for walking pattern
int frontTurnRightUp = 70;
int frontTurnLeftUp = 110;
int backTurnRightForward = 70;
int backTurnLeftForward = 110;
// variable for distance value
int distance = 0;
// average distance value
int distanceCheck = 0;
// Array for distance values
int collectDistance[5];
// Variables for counters
int i;
int f;
int r;
// assign analog pin A1
int sensorPin = A1;
// distance value for danger close. Bigger values are greater distance and smaller values are lower distance
int dangerDistance = 350;
/* Setup function */
void setup()
{
// attach servos
  frontServo.attach(9);
  rearServo.attach(10);
  // assign sensor
  pinMode(sensorPin, INPUT);
  // center servos
  frontServo.write(centerPos);
  rearServo.write(centerPos);
  // wait 3 seconds for start walking
  delay(3000);
  //Serial.begin(9600); // serial data setup
}
/* distance check function */
void scan()
{
    // read 5 distance values
            for (i = 0; i < 5; i = i + 1) {
        distanceCheck = analogRead(sensorPin);
        collectDistance[i] = distanceCheck;
        // serial output for testing
                //Serial.print (i);
                //Serial.print(" = ");
        //Serial.println(collectDistance[i]);
        }
      // checksum of the 5 distance values for getting an average value. This will prevent the robot to change behavior by reading one wrong value
      distance = (collectDistance[0]+collectDistance[1]+collectDistance[2]+collectDistance[3]+collectDistance[4])/5;
      delay(20);
}
// walk forward
void moveForward()
{
  // loop for the servo angels to smoothen the steps
  for (f = 0; f < 39; f++){
   frontRightUp++;
   backLeftForward--;
   frontServo.write(frontRightUp);
   rearServo.write(backLeftForward);
   delay(10);
  }
  // loop for the servo angels to smoothen the steps
  for (r = 0; r < 39; r++){
   frontRightUp--;
   backLeftForward++;
   frontServo.write(frontRightUp);
   rearServo.write(backLeftForward);
   delay(10);
  }
}
// walk backwards to the left
void moveBackRight()
{
frontServo.write(frontRightUp);
rearServo.write(backRightForward-6);
delay(110);
frontServo.write(centerPos);
rearServo.write(centerPos-6);
delay(80);
frontServo.write(frontLeftUp+9);
rearServo.write(backLeftForward-6);
delay(110);
frontServo.write(centerPos);
rearServo.write(centerPos);
delay(80);
}
// walk forward to the left
void moveTurnLeft()
{
frontServo.write(frontTurnRightUp);
rearServo.write(backTurnLeftForward);
delay(110);
frontServo.write(centerTurnPos);
rearServo.write(centerTurnPos);
delay(80);
frontServo.write(frontTurnLeftUp);
rearServo.write(backTurnRightForward);
delay(110);
frontServo.write(centerTurnPos);
rearServo.write(centerTurnPos);
delay(80);
}
// blink LED. This function can be called in any situation you want. Just add led(); in the code where you want to blink the LED.
void led(){
  // loop for the LED to blink it 5 times for 0.05 sec on and 0.1 sec off
    for(int l=0; l<=5; l++) {
      digitalWrite(13, HIGH);
      delay(50);
      digitalWrite(13, LOW);
      delay(100);
    }
}
// that's the loop. This is repeatedly called as long as the robot is powered on
void loop()
{
  // call function for checking the distance
  scan();
  //Serial.println(distance);
    if (distance > 1){ // filters out the zero readings
    // an obstacle is being detected
    if (distance > dangerDistance) {
      // LED at Pin 13 (standard) blinks 5x
      led();
        // 4 steps backward left
        for(int i=0; i<=3; i++) {
        moveBackRight();
        delay(walkSpeed);
    }
      // 4 steps forward left
      for(int i=0; i<=3; i++) {
      moveTurnLeft();
      delay(walkSpeed);
    }
    } else {
      // all clear, no obstacle detected. Just walk forward
      moveForward();
        delay(walkSpeed/100);
    }
    }
}
原廠連結:http://www.seeedstudio.com/depot/Insect-bot-p-2186.html
The Insect Bot mini is an easy to assemble robot for young engineers from 6 to 100 years. With assembling this robot you will learn the basic robotics in terms of how all the components work together. There is a microcontroller which is working as the robot brain and two servo motors for the movement. The IR sensor on it's head will act as an eye to detect obstacles in front. The programming can be done by simply connecting the Beetle controller with the USB port on your computer. It is the best way to start building robot on Arduino.

The brain of Insectbot is "world's smallest Leonardo", a.k.a. Beetle. It is ideal for DIY projects, wearable projects and etc. Its body is made up of two 9-gram servos powered by a rechargable 3.7V LiPo battery. Its eyes are an infrared sensor to detect obstacles. It requires no special tools except a soldering iron, scissors, screwdriver, pliers. You can decorate your Insectbot Mini to give him a unique, cute or funny Christmas outfit. We also provide a step-by-step instruction to help you assemble it.
We provide 3 programming languages for you such as Ardublock, Mind+ and Arduino IDE. For beginners, you can program it simply by dragging and dropping pre-designed blocks visa visual programming softwares Ardublock and Mind+. For advanced DIYers, you also modify Arduino IDE for your liking.

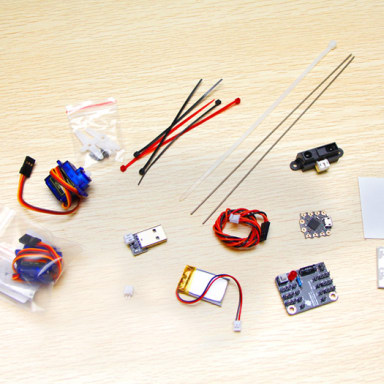
- 1x Beetle (Arduino compatible)

- 1x Beetle Shield
- 2x 9g Micro Servo
- 1x Sharp IR Sensor
- 1x LiPo Battery 3.7V/ 180mAh + Charger
- 2x Steel Wire 200mm x 1 mm
- 1x ABS Sheet (50x50mm)
- 1x Double Sided Foam Tape(L/W/H:40x30x3mm)
- 5x Cable Tie 1.8x100mm
- 1x Cable Tie 4x200mm
Weight: 103 g
This is my first instructable and I am not native English speaker, so please let me know if there is something not clear enough. I am using the metric unit system.
Well, what is the Insect Bot. Actually it's not really an insect because it only has four legs, insects does have six of them, right? However, the robot got the name because of his shape with the thin wire legs and the IR sensor rosed up.
That robot already has a long history. first I built one with standard servos and an Arduino UNO but soon I wanted it smaller and even more easy to build. After a couple of attempts with different designs this one is the final one.
Here you can see the big one: letsmakerobots.com/node/26194
The following is the step by step description, how to assemble the robot and if you are already a bit skilled in such things then it will not take you more than one hour of your time.
This first video shows how the robot could walk after switching it on for the first time and without adjusting the legs :-)
Step 1: Servos building the body
Stick both servos together by using double sided foam tape. Front servo shaft in top and rear servo shaft on the backside.
Make sure you align them properly that they build a nice body for the robot.
Step 2: Servos wrapped
Wrap a big cable tie (4x200mm) around the two servos to secure them. Pull the cable tie very tight to strap the servos together. You may use pliers to give it the final pull.
資料來源:https://www.seeedstudio.com/Insect-bot-p-2186.html
Description
The Insect Bot mini is an easy to assemble robot for young engineers from 6 to 100 years. With assembling this robot you will learn the basic robotics in terms of how all the components work together. There is a microcontroller which is working as the robot brain and two servo motors for the movement. The IR sensor on it's head will act as an eye to detect obstacles in front. The programming can be done by simply connecting the Beetle controller with the USB port on your computer. It is the best way to start building robot on Arduino.

The brain of Insectbot is"world’s smallest Leonardo", a.k.a. Beetle. It is ideal for DIY projects, wearable projects and etc. Its body is made up of two 9-gram servos powered by a rechargable 3.7V LiPo battery. Its eyes are an infrared sensor to detect obstacles. It requires no special tools except a soldering iron, scissors, screwdriver, pliers. You can decorate your Insectbot Mini to give him a unique, cute or funny Christmas outfit. We also provide a step-by-step instruction to help you assemble it.
We provide 3 programming languages for you such as Ardublock, Mind+ and Arduino IDE. For beginners, you can program it simply by dragging and dropping pre-designed blocks visa visual programming softwares Ardublock and Mind+. For advanced DIYers, you also modify Arduino IDE for your liking.

Technical Details
| Dimensions | 215mm x 85mm x 45mm |
| Weight | G.W 114g |
| Battery | Exclude |
Part List
| Beetle (Arduino compatible) | 1 |
| Beetle Shield | 1 |
| 9g Micro Servo | 2 |
| Sharp IR Sensor | 1 |
| LiPo Battery 3.7V/ 180mAh + Charger | 1 |
| Steel Wire 200mm x 1 mm | 2 |
| ABS Sheet (50x50mm) | 1 |
| Double Sided Foam Tape(L/W/H:40x30x3mm) | 1 |
| Cable Tie 1.8x100mm | 5 |
| Cable Tie 4x200mm | 1 |


