官方授權台灣代理分銷
Quirkbot 機器生物套件


原名
Quirkbot Robotic Creatures Kit
貨號
110060487
分類
STEM Education
特價
3,135
暫無庫存
SeeedStudio 目前暫時無庫存,因為該公司無法提供確切恢復供貨時間,為了避免延宕或出貨爭議,恕不提供下單代訂服務。
資料來源:https://www.seeedstudio.com/Quirkbot-Robotic-Creatures-Kit-p-2707.html
Description


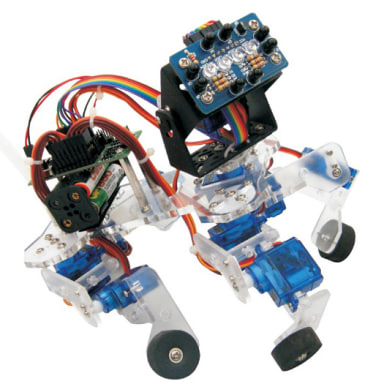
Quirkbot is a little character you can program.
It’s easy to make different shapes and forms: Funny Robots, Toys, Artworks and Much more! Use the included Strawbees construction set with LEDs, Motors and Sensors to realize your own creations and ideas.
Quirkbot Robotic Creatures Kit has everything you need to get started with the Ultimate maker toy.
Perfect for beginners and schools thanks to the super easy programming, electronics with no soldering and Strawbees mechanics, that will get you started in minutes.
Made for Educators, Maker parents and kids of all ages (recommended for 8 years and up) Check out quirkbot.com for latest info.

The Electronics of the Quirkbot has been designed so that it is intuitive to remember the names of the different parts. This makes it easy to talk about, and refer to when programming the different functions.

LED AND SENSOR
LEDs and Light Sensors fit on the horn, legs and arms and are held in place with a straw over it. When putting on an LED, be sure that the long pin of the LED is on the FRONT of the Quirkbot so it can reach and connect with that metallic surface.
SERVO BACKPACK
The backpack connects on the back of the Quirkbot and the motor connects to one of the slots on the backpack. The uppermost pin on the backpack will fit into an open slot on the right side of the battery cover, make sure it's placed right! Also make sure to align the black marking on the backpack slot to the black (or the darker) cable of your servo.
SERVO MOUNTS
To fasten the Servo Mount in your construction, here are two examples of how to wrap and connect Strawbees and creating a Servo Mount. You can add more Strawbees connected to each other to increase the friction and pull their legs through the holes to tighten the Servo Mounts.

ATTACHING A STRAW TO THE SERVO HORN
When putting a straw on the Strawbees on the servo motor arm, make sure to slide it over both the Strawbees and the motor arm itself.

CHARGING
Quirkbot has its own rechargeable battery. The battery starts chargin when the USB cable is connected to a computer or other power sources like a phone charger.
GET HELP
There will always be someone helpful to answer any question you have at the forum: forum.quirkbot.com. Please don’t hesitate to ask!

Quirkbot is easy to code directly from the web with a graphical language. To program the Quirkbot you first go to code.quirkbot.com. When you have created an account you can start creating and uploading code to your Quirkbot.
GOT TO CODE
1.UPLOAD CODE
First time you try to upload, the interface will install a small plugin in your browser, and on a Windows computer you will have to install drivers. The interface will guide you trough how to do it.
2.CREATING CODE
You create new code in the Quirkbot by connecting nodes together and changing the values of them. Here is how you do some basic things:
2.1 ADD & DELETE NODES
By dragging and dropping into your program, and press the X to get rid of them.

2.2 CONNECT & DISCONNECT THE NODES
The connections makes a continuous stream of data go from one node to the other.

2.3 CHOOSE PLACE
All Nodes that control some external part like an LED or Servo Motor needs ti know where that part is placed.

2.4 CHOOSE PLACE
SAVE YOUR CODE AND GIVE IT A NAME
When you do this the code will automatically get a web address. If you want to share your code just share this address, Don’t worry, none but you can change it. If someone shares code with you and you want to make your own copy, press Clone CODE. This is now your code and you can make any changes.

2.5 CHANGE VALUE
By dragging the slider or type in the value directly.

3. ATTACHING LEDS AND LIGHT SENSORS
DOCUMENTATION FOR THE NODES
The Nodes Documentation is starting to take shape and will soon have more useful examples. Dig in deeper there if you want to read up on specific nodes and how they function.
THE FORUM
Check out the Quirkbot Forum! Don’t be afraid to ask us any question.

The Qurikbot and Strawbees system had been developed together with educators to meet their growing interest for maker education and the need for creativity and programming in the classroom. Through many workshops around the world with Kids Hack Day and other close partners we have figured out some key success factors and demands that a maker tool needs to have in an Educational setting. The Quirkbot significantly lowers many existing barriers and completely eliminate others, while still remaining a very open system. This helps the kids and teachers that feels less confident with new tech to really flourish, while not limiting the natural nerds and hackers in a group. It also promotes group learning and sharing. We are continuously developing educational materials and an Educator's Guide is available as a free download on our website. Quirkbot.com


1xQuirkbot Board: Programmable toy that connects to electronics and Strawbees.
1xMotor Backpack: For connecting the Servo Motor to the Quirkbot.
1xServo Motor 120°: This motor can move 120 degrees.
1xSmall Strawbees pack: For building structures with drinking straws and cardboard.
1xStraws pack (50 straws): Flexible building material.
1xElectric Strawbee: To light up your structure and have fun with the light sensor.
1xUSB Cable: For charging and programming.
1xServo Extension Cable: To move things further away from the Quirkbot.
1x Plastic Component Box: To keep all the components tidy.
1xGuide Booklet: With clear pictures and text to get you started.
3x Light Sensor: Sensing light for fun interaction.
6xAlligator Clips: For Touch functions and many other things.
10x Dual Color LEDs: Lights with 2 colors that you can attach to the Quirkbot.
Sticker

Technical Details
| Dimensions | 300mm x 245mm x 50mm |
| Weight | G.W 683.5g N.W 683.5g |
| Battery | Exclude |
Part List
| Quirkbot Board | 1 |
| Motor Backpack | 1 |
| Servo Motor 120° | 1 |
| Small Strawbees pack | 1 |
| Straws pack (50 straws) | 1 |
| Electric Strawbee | 1 |
| USB Cable | 1 |
| Servo Extension Cable | 1 |
| Plastic Component Box | 1 |
| Guide Booklet | 1 |
| Light Sensor | 3 |
| Alligator Clips | 6 |
| Dual Color LEDs | 10 |
描述
Quirkbot是一個小角色,你可以進行編程。
這很容易做出不同的形狀和形式:有趣的機器人,玩具,藝術品以及更多!使用附帶的Strawbees建設帶有LED,電機和傳感器設置,實現您自己的創作和想法。
Quirkbot機器生物套件有你需要開始使用的終極製造者玩具應有盡有。
適合初學者和感謝學校的超級容易編程,電子產品,沒有焊接和Strawbees機制,這將讓你在幾分鐘內啟動。
專為教育工作者,家長製作和所有年齡段的孩子(建議8年及以上)查看quirkbot.com得到最新的信息。
該Quirkbot的電子已被設計,以便它是直觀記住不同部件的名稱。這使得很容易談,並參考編程不同的功能時。
LED和傳感器
LED和光傳感器適合的號角,腿和胳膊,並在地方用吸管在它舉行。當在LED上推桿,確保LED的長銷是在Quirkbot的前面,所以它可以達到並與金屬表面連接。
SERVO背包
背包連接上Quirkbot背面和電機連接到在背包的插槽中的一個。放在背包最上面的針將適用於電池蓋的右側有一個開口槽,確保它放在正確的!同時一定要對準黑色背包插槽黑(或較暗)的伺服電纜標記。
SERVO MOUNTS
要擰緊伺服安裝在您的建築,這裡是如何包裝並連接Strawbees,創造一個伺服安裝兩個例子。可以添加彼此連接,以增加摩擦力,並通過所述孔拉他們的腿收緊伺服支架更Strawbees。
附加秸稈舵機搖臂
把秸稈當在Strawbees伺服電機臂,確保了無論是Strawbees和電機臂本身滑動。
充電
Quirkbot有它自己的可充電電池。當USB線連接到電腦或其它動力源如手機充電器,電池開始chargin。
得到幫助
總會有一個人有幫助回答你在論壇的任何問題:forum.quirkbot.com。請不要猶豫,問!
Quirkbot很容易從網絡與圖形語言直接編碼。要設定Quirkbot你先去code.quirkbot.com。當你已經創建了一個帳戶,您可以開始創建和上傳代碼到你的Quirkbot。
得CODE
1.上傳代碼
您嘗試上傳一次,該接口將在瀏覽器中安裝一個小插件,並在Windows計算機上,你必須安裝驅動程序。該界面將引導您槽如何做到這一點。
2.創建代碼
您可以通過連接節點一起,改變它們的價值創造中的Quirkbot新代碼。這裡是你怎麼做一些基本的東西:
2.1 ADD&刪除節點
通過拖放到你的程序,並按下X來擺脫他們。
2.2 CONNECT和斷開NODES
的連接,使連續的數據流去從一個節點到另一個。
2.3選擇發出
控制一些外部的部分像一個LED或伺服電機需要TI所有節點知道的那部分被放置。
2.4選擇發出
保存你的代碼,給它一個名字
當你這樣做的代碼將自動獲得一個網址。如果你想分享你的代碼只是分享這個地址,你放心吧,沒有,但你可以改變它。如果有人與你分享代碼,你想使自己的副本,請複製代碼。現在這是你的代碼,你可以做任何更改。
2.5更改值
通過直接拖動滑塊或輸入值。
3.裝接LED和光傳感器
文檔用於節點
節點文檔開始初具規模,很快就會有更多的有用的例子。如果你想在特定的節點,它們如何運作讀了更深的挖掘存在。
座談會
退房Quirkbot論壇!不要害怕問我們任何問題。
該Qurikbot和Strawbees系統已經與教育工作者共同開發,以滿足他們對製造商的教育和需要的創造力和編程在課堂上越來越大的興趣。通過對世界各地的許多研討會,兒童黑客日和其他密切的合作夥伴,我們已經找到了一些關鍵的成功因素,並要求製造商工具需要有一個教育環境。該Quirkbot顯著降低現有的許多障礙,並完全消除別人,同時仍然保持一個非常開放的系統。這有助於孩子們和老師,感覺新的技術信心不足,真正蓬勃發展,而不是限制在一組自然書呆子和黑客的攻擊。它還促進組學習和交流。我們不斷開發教材和教育工作者的指南可作為在我們的網站上免費下載。 Quirkbot.com
1X Quirkbot板 :連接到電子產品和Strawbees可編程的玩具。
1個電機背包 :伺服電機連接到Quirkbot。
1個伺服電機120°:該電機可以移動120度。
1X 小Strawbees包 :對於有吸管和紙板建築結構。
1個秸稈包(50吸管):靈活的建築材料。
1個電動Strawbee:要點亮你的結構和樂趣與光傳感器。
1個USB電纜 :對於充電和編程。
1個伺服延長線 :搬東西從Quirkbot漸行漸遠。
1個塑料元件盒 :為了讓所有組件整齊。
1X 指南小冊子 :有了明確的圖片和文字讓你開始。
3倍光傳感器 :光感測為樂趣的互動。
6X 鱷魚夾 :觸摸功能和許多其他的事情。
10X 雙色LED指示燈 :以2種顏色,你可以連接到Quirkbot燈。
貼紙